Admin Setup Instructions
• Admin Setup Instructions •
Now that your CheckIn server is setup it’s your job as owner/admin to follow these step to complete the setup so you and your team can start using CheckIn.
1 First Time Sign In
You first have to connect to your server by first launching FileMaker then going to the File menu > Hosts > Show Hosts. On the window that pops up click on your servers name if you see it or on local then to the right of local there should be a small arrow, click on that to reveal your server’s name to then click on that. This will pop up your server’s image in the main part of the window to the right to select and the choose OK.
2 Create Your Admin & Employee Accounts
Click on the More button at the top to the far right then choose Admin. This will take you to the Admin section and now click Employees in the light blue section below the main button bar area.
- This will reveal a new window called Employee List click +New Employee to add yourself and others. (You can always add your employees later on).
- You do not need to fill out everything in this window but its a good place to centralize employee information in one spot if you wish. The main items that need to be filled out are:
- First Name & Last Name
- In the Account Information section under the Define Login Account: User Name (can just be the first name to make life simpler when logging in)
- Access Level must be chosen (Admin is the default
- Under the GSX Tab fill out your and for each of your technicians GSX User & Tech IDs
Security Group Setup: If you decide to add employees now, you first need to add more security Groups to assign to them since Admin is the only default set. To do this - stay in the same window and just go to the Security Level tab at the top and click the + button to add and name a new group then click on the pencil icon to edit the group accordingly for the user you have in mind.
3 Company Setup Stuff: Company Info
Close the Employee List window and now back in the Admin section click on Company. This will take you to the first tab called Company Info but this info is not needed to be filled out. The only thing you need to do in this window is to add your logo. There is a generous amount of space at the top middle of each printed document for your logo. This was done on purpose in order to give you enough room to showcase your brand. (Your logo will appear in the size in which you bring it over - so you may need to resize it and bring it over again to get to your desired size.)
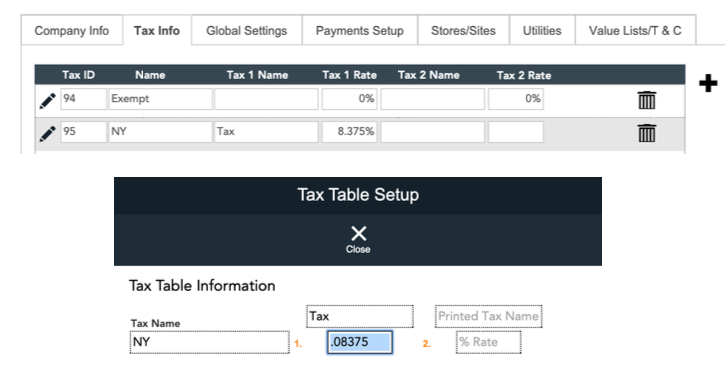
4 Company Setup Stuff: Tax Info
Be default there should be two tax IDs listed. The first one should be called Exempt and the second one needs you to give it a name like Tax and a Tax1 & Tax2 name if necessary. When you click on the Tax 1 Rate field it will open up a Tax Table Setup window to enter your tax amount - Please enter as such: .08375
*In the USA & AU only one tax rate breakdown is typically needed for state and local taxes to be shown. For our Canadian customer, some provinces need to show GST and PST separately and can do that easily in this Tax Table Setup window.
(Please read the Please Note section for more information about how this prints)
5 Company Setup: Payment Setup
This is where you setup your payment method buttons. As stated in this window, you have a maximum of 12 to use.
-You can modify any of the default ones except the ones noted in the Please Note section.
-You can add new ones by simply enter the details in the last blank field at the bottom. (new blank sections will appear each time when needed.)
-The Type need to be selected but you can ignore the Account field.
If you are not using our integrated credit card processing you will need to change any Credit Card payment methods to “other” in order to not have CheckIn waste time looking for a terminal when clicking on Credit Card for payment if there is no integration.
6 Company Setup: Stores/Sites
This is where you setup each of your Store’s information. *Please Do Not Change the Store ID #* The store information you enter here is what prints out on all your documents (Invoices, SRO, Order and Quotes). Please note the following icons and what they are for:
Store hours can be ignored as this is for the Apple tech retail community we serve.
This too can be ignored as this is for the Apple tech retail community we serve.
You only need to fill out this PayLink/Billing info if you want to use our PayLink feature with Fortis
7 Company Setup: Value Lists/ T&C
In this section you have the opportunity to enter your desired Terms and Conditions as well as your custom value lists. Each section has its own tab. (Please read the Please Note in ther T&C tab)
In the Value list tab you can enter your desired values for the sections shown. We particularly like the Customer Type & Customer Referred By. This is a good idea to use and enforce all your employees to adhere to as it can assist with future marketing efforts.
8 Company Setup: Global Setting
Under this tab you will find the section that you will need to fill out if you are going to use and of the Integration CheckIn offers as listed by each radio button such as GSX - Ingram - Reservation etc.
*CheckIn does not charge you for all the great integrations we programmed it for, but for some such as Twilio or SendGrid there may be a fee to use their platforms.
These Section Should be Ignored:
AppleCare, GSX, Ingram & Reservations as they pertain to the Apple tech community that also use CheckIn.
SendGrid - Twilio - Paylink
Once your accounts are setup with these companies, you basically just need to enter the requested information show in each of these sections.
Ingram: Is a tech distributor you can get product info from and send CheckIn POs to.
SendGrid: Is the email integration option you can use to send email out directly from CheckIn.
Twilio: To send texts via an SRO.
PayLink: Allows you to email clients a payment link that links to and SRO, Order or Invoice for payments.
9 Email
In this section you are deciding if you want to use your Apple Mail client to send emails or you can send emails via our built in FileMaker SMTP option or via SendGrid integration. The default Email Client is set which will open a new mail window in your Apple Mail App to then allow you to send an email.
For details on setting all this up please see our PDF called Email Setup Options in CheckIn™
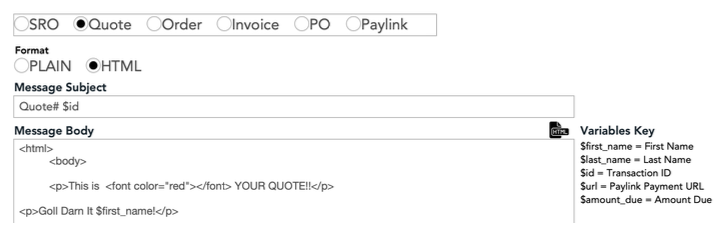
10 Company Setup: Default Emails
Under this tab you will have the opportunity to setup your default subject and/or default email message body when sending out emails via any of of the listed options. The variable key helps you to customize your message.
Next Steps Needed
- If products were imported into CheckIn you need to go to the Product dashboard and then click the Department button to see a list of your departments that were brought over during the import of your products. Make sure by each department in the list has the default tax show and selected.
- Make sure you read our PDF called CheckIn™ POS Best Practices & FYIs - (Your staff should read section 2 only)
Once you complete your Admin setup, please email us at [email protected] so we can setup a time to review your Admin settings and then we’ll setup a time for CheckIn staff training!