PayLink Setup Instructions
Introduction:
PayLink technology is from Fortis (Formerly: Payment Logistics) that we integrated within CheckIn to make your life easier when you need to collect money from customers. You no longer need to send them a link to your Pay Now button on your website or take payments over the phone via the online portal manually, Hooray!
For our United Sates customers, the PayLink features allows you to email customers a custom link in order for them to make a payment on an SRO, Order or Invoice and to pay for your subscription product or service if their credit card on file no longer works as CheckIn will automatically email the customer a PayLink link for payment and then from that point forward it will up the subscription for future auto payment.
This PayLink feature will do the following for you: 
- Provide a PayLink specific button on SROs, Orders and Invoices alongside your other payment button option for easy access.
- When clicked it will either open Apple Mail along with your email template and payment link or a small email window will pop up for you to send an email or a text of the link along with the SRO, Order or Invoice.
- Save you tons of time collecting money from customers!
Please see the following pages for setup and feature information…
Some FYIs First
- You can use PayLink without going to Paygistix Cloud 2.0 which is the enhanced CC processing integration.
- You can use PayLink without going to Paygistix Cloud 2.0.
- PayLink sends out payment links for subscription management customers.
- You can still use your existing terminals with PayLink.
- PayLink setup is needed to use Paygistix Cloud 2.0
Setup:
1 Sign Up With PayLink
• To sign up please visit https://pll.formstack.com/forms/checkinpos_paylink_registration
• Click on their Start Base Plan button in the Base Plan Free section.
• You will hear back from Fortis with your account info. This will give you the token you need to apply to CheckIn for PayLink to work.
2 Setup PayLink In CheckIn
• Click on More at the main CheckIn window and go to Admin>Company>Global Settings tab then click on the PayLink radio button to activate PayLink with a Y as show below.
• Make sure the PayLink URL is listed as: https://pay.link/payapi/ (without the word dev in it)

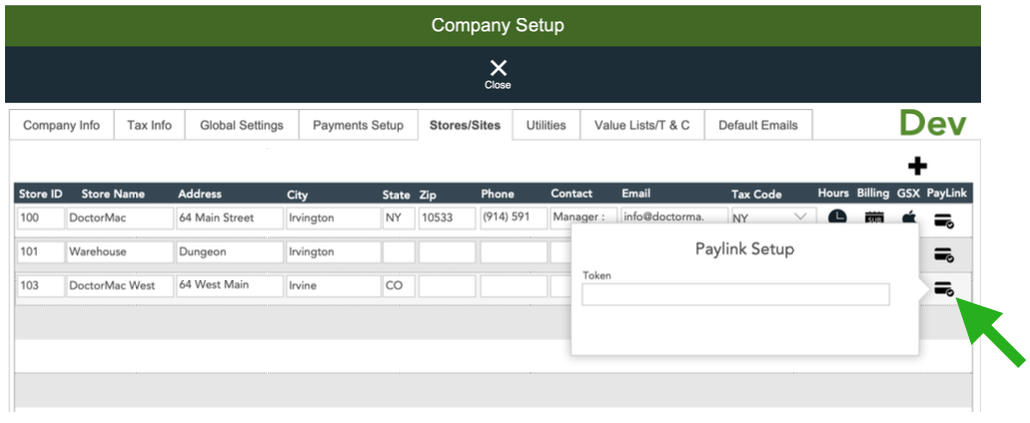
3 Adding PayLink In Token
• While at the same Company Setup Window, click on the Store/Sites tab
• Find the PayLink credit card icon by your current store and paste in your PayLink Token that you found on your PayLink portal. (please note that is your current version of CheckIn you may not have the PayLink icon in this section as it will reside in the Global Settings tab)
• Enter a Token for each store in this section. (you may need a PayLink account for each store)
4 Adding PayLink Automation Script to FileMaker Server
In order for PayLink to automatically check for payments made by customers and to then apply them to SROs, Orders & Invoices you will need to follow the instructions below to activate a FileMaker script we created:
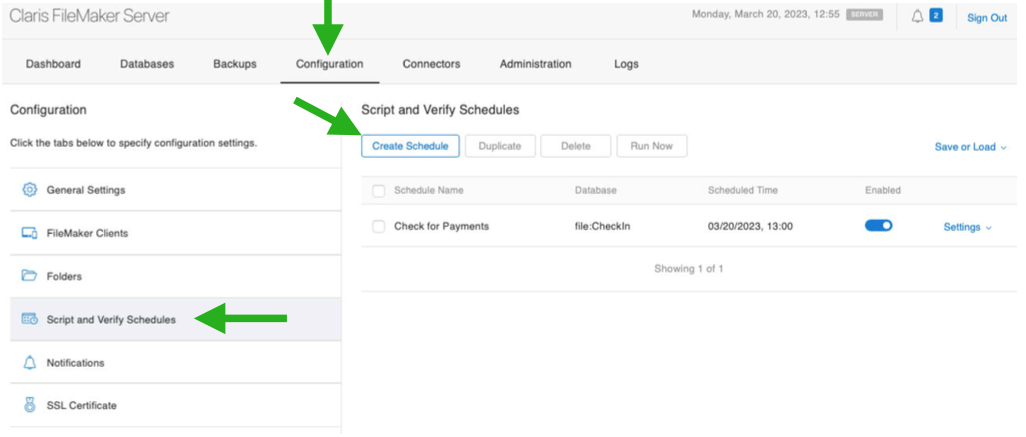
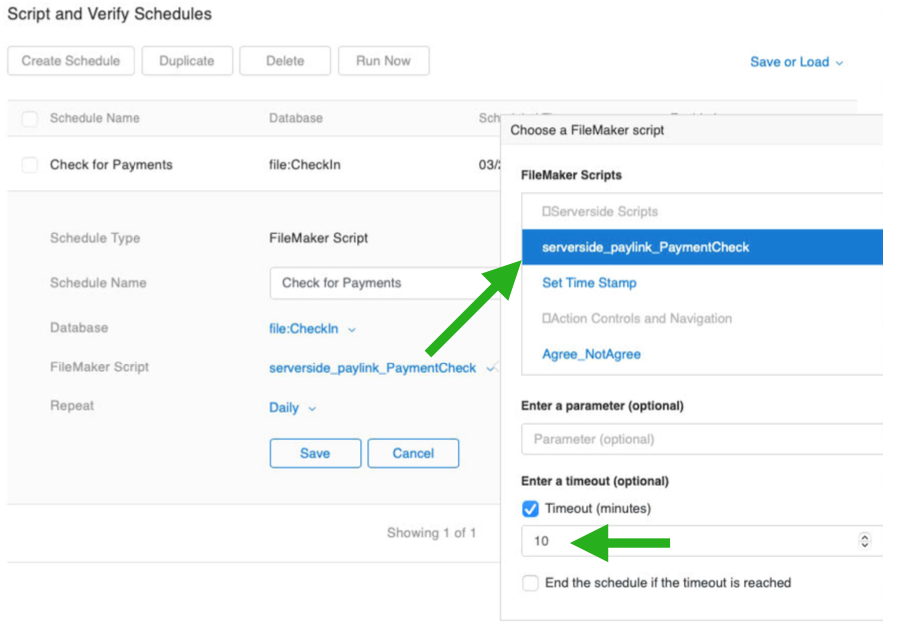
1. Go to the FileMaker Server Console via Safari then to >Configuration Tab >Script & Verify Schedule> Create a New schedule.
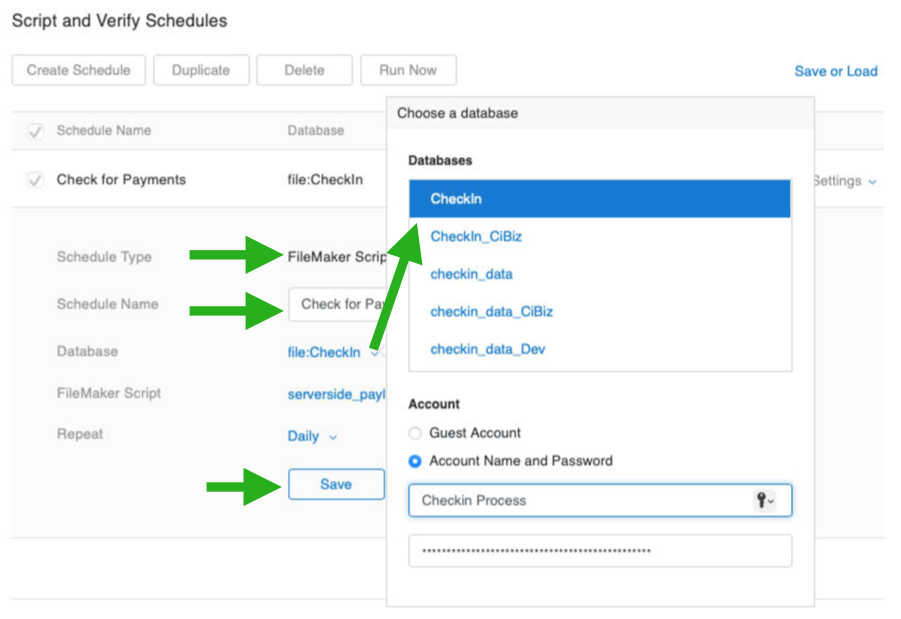
2. Schedule Type = Leave as FileMaker Script
3. Schedule Name = Give it the name Check for Payment
4. Database = CheckIn
5. Account Name & PW= Username: CheckIn Process Password: checkin
6. For FileMaker Script Choose = serverside_paylink_PaymentCheck (listed at the top)
7. Set Timeout to = 10 minutes
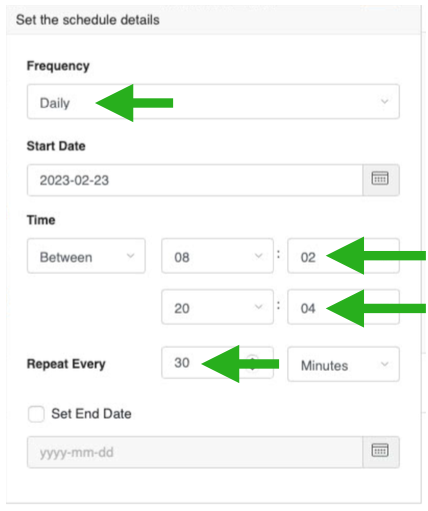
8. Repeat = Daily > then chose Start Date as today
9. Time = • Between (for your Store hours but pick a unique time not on the hour as to not overload server! • The Repeat = 30 minutes
10. Click out of pop up and then click Save
1
2-4
5-10
Closer Look at The Repeat Section
Additional Information - Sending Emails
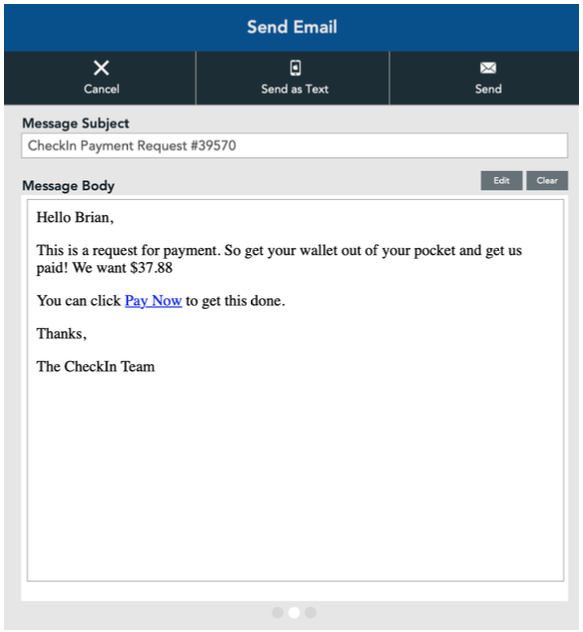
Depending on how you have your email setup will determine if Apple Mail opens up for your PayLink email to send out or if the below window opens up. If you have your email setting for Email output for Transactions under Company>Global Settings tab set to either SMTP or SendGrid, you will see the Send Email window pop up when using the PayLink button.
After sending an email or text you will receive a confirmation window as show here:
Setting Up Your PayLink Email & Text Templates
It's important to setup your PayLink email template to save you time and you can do that by:
• Going back to Company Setup and then to Default Emails tab.
• Click PayLink radio button
• Choose Plain or HTML for your desired format (HTML will only be available when using SendGrid)
• Feel free to use the Variables Key to customize your email.
• To setup your text/SMS template use the section at the bottom named accordingly.