Getting Started with Shopify Integration
CheckIn has the ability to integrate with your existing, or newly created Shopify website. Currently, CheckIn's Shopify integration supports the following:
- Automated syncing of Products from CheckIn -> Shopify
- Automated Collections and Tags syncing from CheckIn -> Shopify
- Automated Order pulldowns from Shopify -> CheckIn. Orders fulfilled on your Shopify site will then be converted into Invoices in CheckIn, adding any payments made on the order.
- Automated pulldown of Customer information on Orders from Shopify -> CheckIn. This requires a non-Basic Shopify plan. See the next section for details.
There are only three basics steps to going live with Shopify in CheckIn, all outlined in this document:
- Setting Up Your Your Shopify Integration Settings
- Product Pulldown
- Activating Shopify Sync
Things to Consider Before Proceeding
The integration setup process is very simple, however there are a few things to consider and discuss before moving forward.
For example, the onboarding process may differ depending on whether you are new to Shopify or already have an existing Shopify store. For a new Shopify store, it is as easy as setting up the integration and selecting which products to sync up to Shopify.
However, if you have an existing store, CheckIn has the ability to do a one-time pulldown of all your products AND collections from Shopify to CheckIn. This process will take all of your Shopify products and create them in CheckIn. If a product already exists in both Shopify and CheckIn, it will "link" them together for future syncing. Therefore, it is important that your data in Shopify is as cleaned up as possible before starting this Product pulldown process. It is recommended that you delete as many Archived products as you can. (if they won't be sold again) This also applies to Collections. See Pulling Down Products and Collections section for more details on this process.
Another consideration is which Shopify Plan you will be using. CheckIn's integration with Shopify works no matter which plan you have. However, please note that if you are subscribed to the Basic plan, due to Shopify's API limitations, any Orders that are synced from Shopify into CheckIn will NOT include customer information and you will need to enter that manually. Aside from that, it is up to you which plan is more convenient for you.

Depending on your business, selling in fractional units is something else that needs to be considered. For example, if you are a quilt shop, you might input your fabric as yards into CheckIn, but may want to sell that fabric online in 1/8th yard increments. See Selling in Fractional Units on Shopify through CheckIn for more information.
Finally, consider your future workflow when fully integrated. Once Shopify integration is activated in CheckIn, all new Products and Collections must be created exclusively in CheckIn and synced with Shopify. Any modifications to Products must also be done from CheckIn. In Shopify, the focus should be limited to fulfilling and processing orders and letting those sync into CheckIn. See Utilizing Shopify Integration with CheckIn for a more in-depth view on the Checkin -> Shopify workflow.
Please contact CheckIn Support at [email protected] if you are considering integrating with Shopify or if you have any questions about the setup process.
Setting Up Your Shopify Integration
To begin, log into your Shopify store admin page. If you are are a new Shopify user, you will have to create a new store and subscribe to a Shopify plan.
Next, navigate to your Shopify Settings and get your Shopify store name. This will typically be the name of your store, but sometimes it will be a random set of letters and numbers.

Next, navigate to the company setup screen. Insert your store name in the Shopify Store Name field, located in the Shopify tab.

Then, return to Shopify to continue the configuration.
You must now create a CheckIn Developer App within Shopify to obtain an API Access Token by doing the following:
- In Shopify, go to the Settings page. Click on Apps and Sales Channels.
- At the top right of this section, click on Develop Apps.
- Click the Create An App button. Enter the name CheckIn and then click Create App.
- You should now be in the App Development -> CheckIn App screen
- Click on the Configuration tab.
- Click on the Configure button for the Admin API Integration.
- Now select EVERY access scope available. There will be about 38 to click on. When done, click on Save.
- Navigate to the API Credentials tab and click the Install App button you see in the first section called Access Tokens.
- Click the Install button on the window that pops up.
- Now in the Admin API Access Token section at the top, click Reveal Token Once in order to see your token. You can only reveal this token ONCE. If you do not copy it the first time you reveal it, you won't be able to see it again. This will result in you having to repeat the steps above.
- Copy the token.
- Go back to CheckIn's Company Settings section and go to the Shopify tab. Paste the token into the API Access Token field.
- Enter 2024-01 in the API version field. (see screenshot above for example)
- If the Log API Calls checkbox is selected, click to uncheck it. This feature is used by the CheckIn development team to debug any issues that may arise with Shopify.
- If you want the Cost and Price of Products updated in Shopify any time you change them in CheckIn, make sure the Update Cost/Price checkbox is checked.
- Click on Test Access. Expand the pop-up box to see the full message. You should receive a pop-up with information about your store, such as the store name, address, etc. If you receive an error please contact Checkin Support.
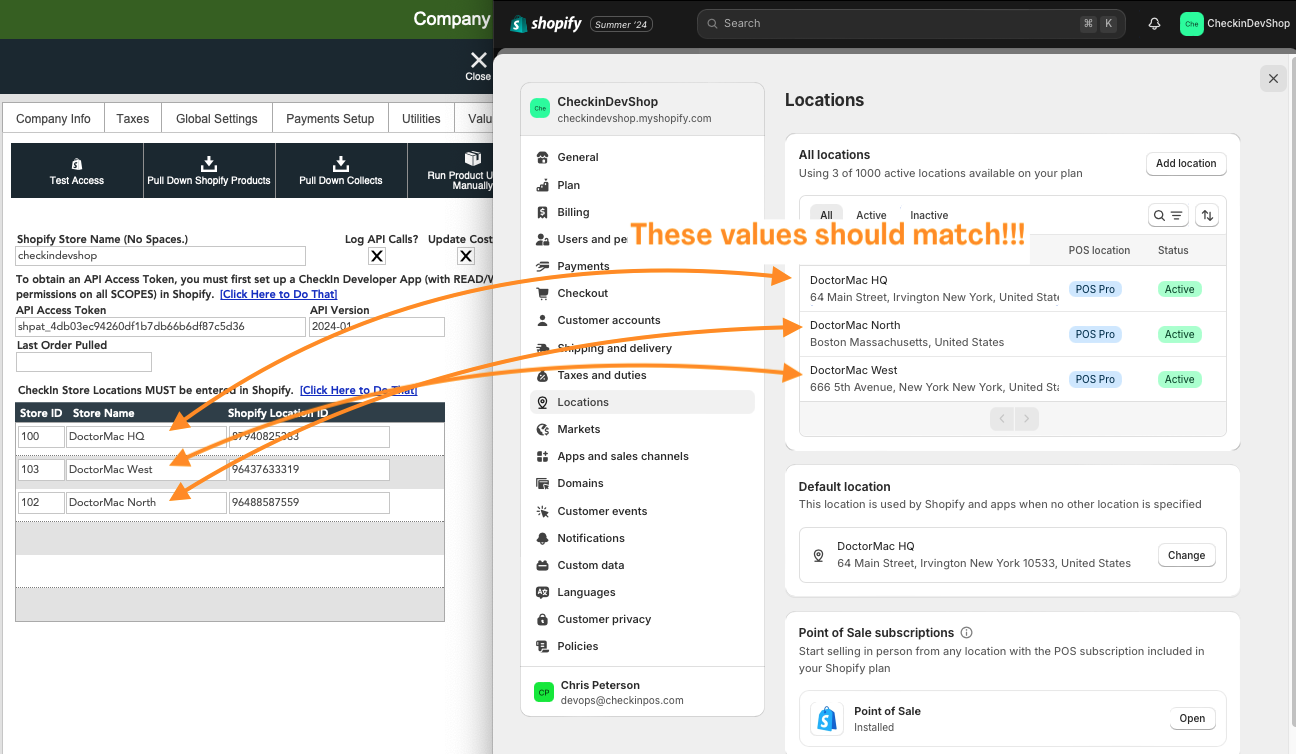
- Next, ensure that each of your CheckIn Store Locations match the locations specified in Shopify by clicking on the Click Here To Do That button in CheckIn.